Shutterbug RSS Feed
New Member
Exposure bracketing in an invaluable technique when photographing outdoor scenes in high-contrast situations that make it impossible to capture what you see through the viewfinder in a single shot. In this episode you'll learn what one pro says is the easiest way to get the job done.
Instructor Jalen Oban is a landscape photographer who explains the technique like this: "By taking multiple shots of the same scene at different exposure levels and blending them together, exposure bracketing ensures that both the highlights and shadows are properly exposed" The result is a more balanced and accurate final image.
This method is particularly useful when the dynamic range of a scene exceeds the capabilities of your camera's sensor. Examples include landscapes shot at sunrise or sunset with bright skies and shadowy foregrounds. The process involves capturing three shots of the scene; one exposed for the highlights, another for the shadows, and a third to balance out the overall exposure.

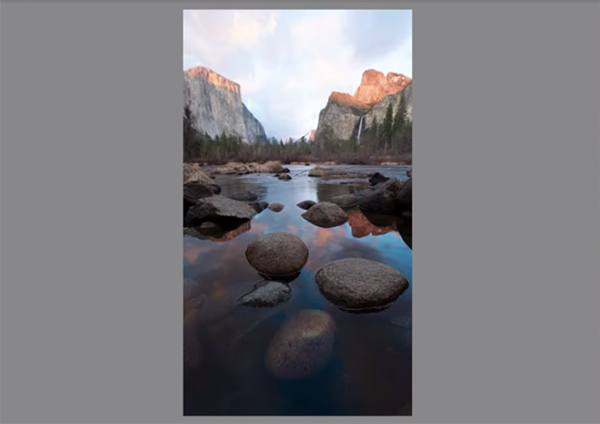
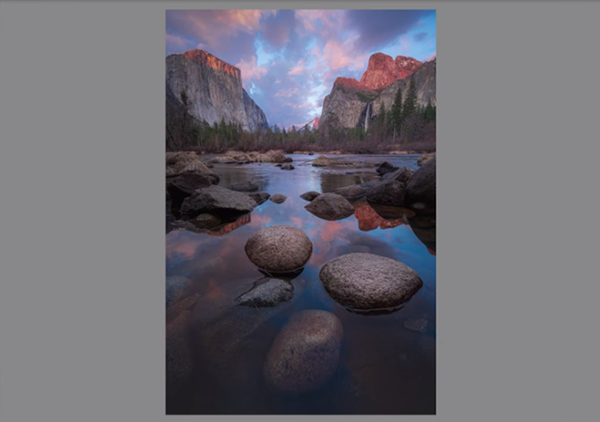
Then all that's necessary is to blend these photos together in the simple manner that Oban explains to arrive a final composite image that "retains detail in both the brightest and darkest areas of the scene." He uses an image from his recent trip to Yosemite National Park to demonstrate how easy and effective this is to accomplish.
Some cameras have a built-in Auto Bracketing mode that simplifies the process, but there's no need to worry if the camera you use doesn't have this capability. That's because you can manually adjust the shutter speed to achieve the necessary variations in exposure.
After returning home Oban imported his three images into Lightroom and selected them in the Library module. Then he right-clicked and navigated to Photo Merge HDR to initiate the merging process. Next he demonstrates how to refine the HDR image by applying adjustments to contrast, color balance, masks, and other parameters to achieve the specific result that you desire.

Bottom line: Exposure bracketing is a very powerful method for overcoming the challenges of difficult light and the density-range limitations of a camera. With Oban's straightforward method of shooting and merging multiple photos you'll be able to create stunning results that greatly exceed your expectations.
Oban's instructional YouTube channel is full of helpful techniques like this one, so be sure to pay a visit and explore when you have time.
We also suggest watching the tutorial we posted recently from another accomplish pro who demonstrates how to set focus for shallow depth of field when shooting landscapes, macro, and other outdoor photographs.
Continue reading...
Instructor Jalen Oban is a landscape photographer who explains the technique like this: "By taking multiple shots of the same scene at different exposure levels and blending them together, exposure bracketing ensures that both the highlights and shadows are properly exposed" The result is a more balanced and accurate final image.
This method is particularly useful when the dynamic range of a scene exceeds the capabilities of your camera's sensor. Examples include landscapes shot at sunrise or sunset with bright skies and shadowy foregrounds. The process involves capturing three shots of the scene; one exposed for the highlights, another for the shadows, and a third to balance out the overall exposure.

Then all that's necessary is to blend these photos together in the simple manner that Oban explains to arrive a final composite image that "retains detail in both the brightest and darkest areas of the scene." He uses an image from his recent trip to Yosemite National Park to demonstrate how easy and effective this is to accomplish.
Some cameras have a built-in Auto Bracketing mode that simplifies the process, but there's no need to worry if the camera you use doesn't have this capability. That's because you can manually adjust the shutter speed to achieve the necessary variations in exposure.
After returning home Oban imported his three images into Lightroom and selected them in the Library module. Then he right-clicked and navigated to Photo Merge HDR to initiate the merging process. Next he demonstrates how to refine the HDR image by applying adjustments to contrast, color balance, masks, and other parameters to achieve the specific result that you desire.

Bottom line: Exposure bracketing is a very powerful method for overcoming the challenges of difficult light and the density-range limitations of a camera. With Oban's straightforward method of shooting and merging multiple photos you'll be able to create stunning results that greatly exceed your expectations.
Oban's instructional YouTube channel is full of helpful techniques like this one, so be sure to pay a visit and explore when you have time.
We also suggest watching the tutorial we posted recently from another accomplish pro who demonstrates how to set focus for shallow depth of field when shooting landscapes, macro, and other outdoor photographs.
Continue reading...
