Shutterbug RSS Feed
New Member
Adobe's new Adaptive Color Profile is an amazing AI-based tool that analyses an image and adjusts tones and colors to make them "look just right." The experts at Adobe put it like this: "The effect is as if the AI has changed exposure, shadows, highlights, Color Mixer, Curves, and other key controls for you."
Today's Australian instructor Charles N. provides a step by-step tutorial on how to use the Adaptive Color Profile in Lightroom Classic and says, "it's a great starting point in your image-editing workflow." This technique simplifies subsequent adjustments for balancing overall brightness, lightening shadows that are too dark, and refining overly bright highlights.
Charles has more than a decade of experience teaching landscape and wildlife photography, as well as offering expert advice for mastering Lightroom and other post-processing software. In this episode he explains why the new Adaptive Profile goes far beyond one-size-fits-all, and how he employs it with different types of images.

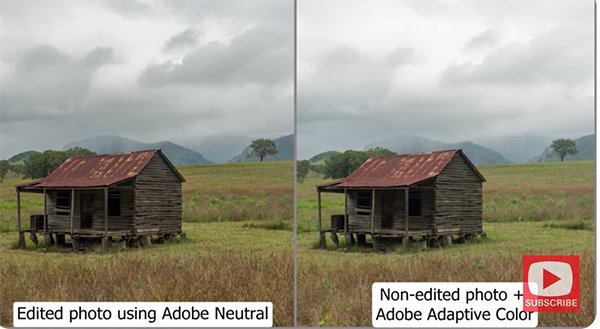
The first example is a pretty landscape image of an interesting old hut in the foreground of a scene with hills looming in the distance. Charles already edited the shot using Lightroom's familiar Neutral Color Profile to demonstrate what happens when you sit back and watch the Adaptive Color Profile work its magic instead.
It's important to keep in mind that this technique is only intended for use with Raw files, so don't try it with Jpegs or TIFFs. This new tool is easy find because it appears at the top of the Profile dropdown menu. There's a line beneath this option to indicate that it's different than all the other profiles beneath.
Just click on your photo after choosing Adaptive Color and BOOM, the image is automatically examined and transformed in seconds. Charles then compares the version he spent 10 minutes editing to the AI-based version and they look remarkably similar. As he exclaims, "This is the beauty of the Adaptive Color profile. Sometime it gets it spot on, while other times a bit more work is necessary because nothing is perfect with AI."
Charles continues the lesson by apply Adaptive Color to a few other landscape and wildlife photos, and the benefits are equally impressive, especially when you consider that this approach only requires a single click. So take a look and see if you agree. Then head over to Charles' instructional YouTube channel where there's much more to learn.
And don't miss the earlier tutorial we featured with another post-processing expert who demonstrates when, why and how to use a straightforward time-blending technique to create landscape photographs with perfectly balanced tones.
Continue reading...
Today's Australian instructor Charles N. provides a step by-step tutorial on how to use the Adaptive Color Profile in Lightroom Classic and says, "it's a great starting point in your image-editing workflow." This technique simplifies subsequent adjustments for balancing overall brightness, lightening shadows that are too dark, and refining overly bright highlights.
Charles has more than a decade of experience teaching landscape and wildlife photography, as well as offering expert advice for mastering Lightroom and other post-processing software. In this episode he explains why the new Adaptive Profile goes far beyond one-size-fits-all, and how he employs it with different types of images.
The first example is a pretty landscape image of an interesting old hut in the foreground of a scene with hills looming in the distance. Charles already edited the shot using Lightroom's familiar Neutral Color Profile to demonstrate what happens when you sit back and watch the Adaptive Color Profile work its magic instead.
It's important to keep in mind that this technique is only intended for use with Raw files, so don't try it with Jpegs or TIFFs. This new tool is easy find because it appears at the top of the Profile dropdown menu. There's a line beneath this option to indicate that it's different than all the other profiles beneath.
Just click on your photo after choosing Adaptive Color and BOOM, the image is automatically examined and transformed in seconds. Charles then compares the version he spent 10 minutes editing to the AI-based version and they look remarkably similar. As he exclaims, "This is the beauty of the Adaptive Color profile. Sometime it gets it spot on, while other times a bit more work is necessary because nothing is perfect with AI."
Charles continues the lesson by apply Adaptive Color to a few other landscape and wildlife photos, and the benefits are equally impressive, especially when you consider that this approach only requires a single click. So take a look and see if you agree. Then head over to Charles' instructional YouTube channel where there's much more to learn.
And don't miss the earlier tutorial we featured with another post-processing expert who demonstrates when, why and how to use a straightforward time-blending technique to create landscape photographs with perfectly balanced tones.
Continue reading...